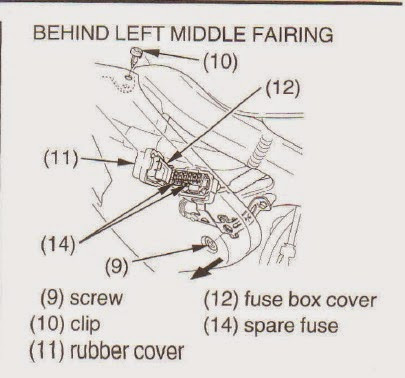

Before seeking the resolution below, thoroughly check the fuses for the headlights located on the left side of the mid fairing (see image below). This guide is specifically created for 2003-2006 CBR600RR. Newer model bike may or may not applied. Stable hands and soldering experience is required, failure to have this will result in a short on other electrical components.
![Image]()
Problem: Both headlights do not turn on when the key is at the "ON" position or after the engine has started and running. High beam headlight doesn't respond when the high beam button is pressed. On the initial start-up of the gauges, the high beam light indicator is lit, but stayed off.
Cause: Solder point or headlight fuse is broken.
Tools Required:
1. Remove the 2 screws located on the bottom of the "start" button housing.
![Image]()
![Image]()
2. Carefully open the housing and unscrew the silver screw.
![Image]()
3. Once the metal plate is removed, check to see if any of the 3 wires are disconnected. Make sure to wiggle the wires to confirm that the connection is solid. It may appeared that the soldering joint are connected, but in fact, it may not. The headlight wire is colored red/black.
![Image]()
4. Next, remove the wire clamp screw (1) along with the screw that hold the "start" button in place (2). Take a careful look at how the wire clamp is assembled, the housing will not snap together if done incorrectly. The plastic tab underneath the metal clap may break off.
![Image]()
5. Carefully remove the "start" button from the housing to expose the electrical component and to ease the job of soldering.
![Image]()
![Image]()
6. Plug in your soldering iron and let it warm up to the operating temperature (2-3 minute). Using an additional hand to hold the button, melt the solder core/lead onto the contact point shown in red and let it cool. Note: if the solder core has flux (solder glue, yellow looking liquid when melted), it will stick very easily without any effort.
![Image]()
7. With one hand holding the headlight wire, while the other holding the soldering iron, melt the solder ball done in step 6 and insert the headlight wire into the liquid solder. Once the connection is secured, pull on the wire to make sure it sticks.
8. Turn the key to "ON" position to see if your headlight turns on. Reverse the steps to reassemble the start switch.
Good Luck! Thanks to DCope17 and a few others for the help.

Problem: Both headlights do not turn on when the key is at the "ON" position or after the engine has started and running. High beam headlight doesn't respond when the high beam button is pressed. On the initial start-up of the gauges, the high beam light indicator is lit, but stayed off.
Cause: Solder point or headlight fuse is broken.
Tools Required:
- Philip Screw Driver
- Soldering Iron (Fry's, Radio Shack)
- Soldering Lead with Flux (Fry's, Radio Shack)
- Tweezers
- An additional person to hold the device in place while soldering.
1. Remove the 2 screws located on the bottom of the "start" button housing.


2. Carefully open the housing and unscrew the silver screw.

3. Once the metal plate is removed, check to see if any of the 3 wires are disconnected. Make sure to wiggle the wires to confirm that the connection is solid. It may appeared that the soldering joint are connected, but in fact, it may not. The headlight wire is colored red/black.

4. Next, remove the wire clamp screw (1) along with the screw that hold the "start" button in place (2). Take a careful look at how the wire clamp is assembled, the housing will not snap together if done incorrectly. The plastic tab underneath the metal clap may break off.

5. Carefully remove the "start" button from the housing to expose the electrical component and to ease the job of soldering.


6. Plug in your soldering iron and let it warm up to the operating temperature (2-3 minute). Using an additional hand to hold the button, melt the solder core/lead onto the contact point shown in red and let it cool. Note: if the solder core has flux (solder glue, yellow looking liquid when melted), it will stick very easily without any effort.

7. With one hand holding the headlight wire, while the other holding the soldering iron, melt the solder ball done in step 6 and insert the headlight wire into the liquid solder. Once the connection is secured, pull on the wire to make sure it sticks.
8. Turn the key to "ON" position to see if your headlight turns on. Reverse the steps to reassemble the start switch.
Good Luck! Thanks to DCope17 and a few others for the help.
 how long did it take to get that taken care of? I got a tight timeframe today but hopefully can squeeze it in ASAP.