

First off a word on maintenance...
So, let’s say that hypothetically you want to leave off doing you valve clearances for a while, this is what you are doing:
Have a look at the yellow line on this pic:
![Image]()
At the moment you’re on the right hand side of the "constant failure rate" section. You can rename the y axis "probability of failure" and the x axis "mileage".
Many people will be ok if they let the service interval lapse because it's the probability of failure that is increasing, which doesn't mean that it will definitely fail. That however doesn't make it the right way to go.
There are a few different maintenance methodologies you can look at:
Breakdown maintenance:- Wait until it breaks then fix it, this has the advantage of the longest service life however when the item breaks it can take other things with it and your bike can be out of action for quite some time. Given the failure of one item will cause the failure of other things it is readily apparent that this method can be quite expensive.
Preventative (or interval based) maintenance:- This is based on the curves in the picture above, what we are doing is changing items at a given interval to make sure you stay in the flat part of the curve, this ensures that failures are as unlikely as possible and that downtime is managed. The downside is that you may be replacing parts that are perfectly ok, or adjusting things where it is not particularly necessary it does still work out significantly cheaper that the breakdown maintenance method.
Condition based maintenance:- This is where something is only adjusted or replaced when the machine starts showing symptoms that it is wearing out, there are a bunch of different methods that can be used for condition monitoring and analysis that I wont go into but suffice to say that this method gives the advantages of the other two without the downsides and is the cheapest overall and as such is the preferred.
Honda use a combination of condition based and interval based maintenance, at a particular interval the condition of an item is checked for signs of premature failure, then if necessary it will be replaced, other things like your chain are maintained purely on an interval basis (for me every Friday arvo). This ensures that replacing expensive parts is not done until it is necessary but things are checked often enough to pick up premature failures.
So while your valves may be perfect, the reason they should be checked is that this is about the time premature failures may start to occur so it is a good idea to have it inspected because the last thing you want is to drop a valve.
If you’re worried about the cost this is a job that someone with a reasonable mechanical aptitude can tackle by themselves without any great difficulty, there is a write up in the how to section if you’re interested. But IMO you are far better off having it done for no reason than finding out that you should have.
Now the how to bit:
Now that we have covered a couple of different types of maintenance we can have a look at what needs to be done and how to actually go about it, I know that the info presented may appear to be for a particular year model but it applies across the board...
So, given that a few of you are unlikely to know exactly what kind if things need to be done and when they need doing, here is a picture of the maintenance chart you will find in your service manual:
![Image]()
Next I'll address each item on its own:
Fuel Lines
This is an easy thing to check, in basic terms you are simply lifting the tank and inspecting the fuel lines for leaking or weeping around all of the connections, including the banjos and where the fuel rails meet the injectors, and looking for cracking of any of the lines.
If you do notice anything, replace the part in question immediately. In addition to this it’s generally a good idea to replace your flexible fuel lines once every 4 years simply as a matter of course due to the potential outcome if one fails...
Throttle
Again, another simple one - just check how far your throttle moves before the slack in the cables is taken up, this should be about 2 - 4mm. If it’s more, you can adjust it at both the throttle and throttle bodies.
Air Filter
Something you should never skimp on is your air filter - when it gets blocked up your engine will start running rich which will result in reduced fuel economy and power, but thankfully its not a dangerous situation for you motor to be in. However if you let it get to bad and stuff (dust) starts to pass through it you will find that you begin to grind away the inside of your engine. To replace it just pop you fuel tank up, then undo the brace holding your ECU in place, unplug the IAT (intake air temp) sensor and undo all of the screws holding the top of the air box on and remove it from the bike, next undo the screws holding the air filter and replace with a new element.
Here is an excellent write up: http://www.600rr.net/vb/showthread.php?t=182601
Spark Plugs
IMO this is one of the more important things to check periodically as it is an excellent gauge of how well your engine is running, what you want to see when you pull them out is a light brown coating, if you have a white coating you are most likely running lean and if you have a dry black carbon coating your probably running rich. You also want to make sure that the spark plug electrode is nice and pointy, and that the gap is 1mm (0.04") - check this with a wire gauge not a feeler gauge. If the spark plug is damaged in any way or excessively dirty replace them with new ones.
The spark plugs are a bit of a PITA to remove, if you have an 03-06 you are in luck cause your bike came with a tool specifically for doing this otherwise, see if you can get the tool... all you have to do is remove the lowers and mids, undo the radiator (but not the coolant hoses) and horn, then unplug the wires from the coils and pull the coils out (not easy) then undo the spark plugs.
When you put them back in you want to do them up hand tight then half a turn further.
Here is a write up for the plugs: http://www.600rr.net/vb/showthread.php?t=221626
Please note that Kidnplay has removed his radiator hose, which while it will make life easier, is not necessary.
Spark plug part numbers:
03-06
NGK: IMR9C-9HE
03-08
NGK: IMR9C-9HES (NGK alternative to the 9HE)
DENSO: VUH27D
09+
NGK: IMR9E-9HES
DENSO: VUH27D
Valve Clearances
Only attempt to do this if you have some mechanical aptitude as there are a few things that can go wrong...
Having said that, it is certainly something that the home mechanic can successfully accomplish.
One thing to be aware of is that if the clearances are out a little you may end up not being able to ride the bike for some time while you wait for the correct shims to come in at your local Honda dealer, cause believe me the last thing you want to do is go through the effort of pulling it all apart only to have to do it all again a week later when your bits arrive.
For a how to check out this thread: http://www.600rr.net/vb/showthread.php?p=3262595 (Thanks Dreamzboy)
Or there is this one, its a little less detailed: http://cbrworld.net/forums/thread/248256.aspx (Thanks abadfish)
Engine Oil and Filter
IMO you should check your engine oil level every time you clean your chain, ideally you should do it before every ride but who is going to do that?
There is a lot of talk about what oil you should and or shouldn't use, I'm going to enter into that discussion a little here...
It's quite simple, there are four things to consider:
1. You have three types: Synthetic, semi-synthetic and mineral. The way I see it, you should run a mineral oil for the first 1000 miles or so but after that it doesn't really matter to much so it’s all down to personal preference.
2. Brand. Pay for a well know and decent brand and your set, i.e. stick with Motul, Castrol, Amsoil and the like.
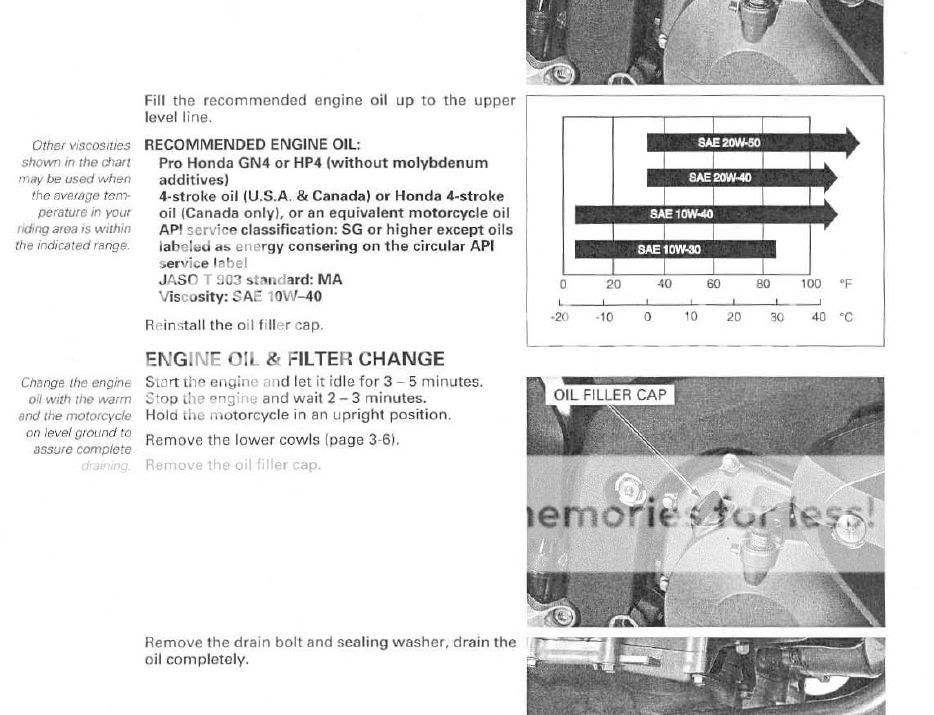
3. Viscosity. The standard oil that comes in the bike is SAE 10w40, this will be suitable for almost everyone on here and I would recommend sticking with it for the best part, however I have included the chart just in case you want to pick a different one.
4. Don’t buy one that is labelled 'Energy Conserving' or that contains molybdenum additives or you will find that your clutch will slip.
![Image]()
As for changing the oil and filter check out this thread here:http://www.600rr.net/vb/showthread.php?t=116041
When you put your drain plug back on, just make sure to use a new washer cause the last thing you need is a rear tyre covered in oil, and do the plug up to 22ft-lb
When you replace the oil filter itself you should apply some new clean oil to the rubber gasket and do it up to 20 ft-lb, or hand tight then 1/4 - 1/2 a turn further.
Idle Speed
Chances are that you don't have to check this at all as you will notice as soon as its starts to get a bit off, but fwiw:
To adjust the idle have a look down on the left hand side of the bike and you will see a knob down next to your coolant hoses, give that a turn to adjust the idle. It should be set to 1300rpm +/-100.
If you do decide to adjust it, be aware that the cable will sometimes break right next to the throttle bodies, and it’s a bit of a PITA to change it.
So, let’s say that hypothetically you want to leave off doing you valve clearances for a while, this is what you are doing:
Have a look at the yellow line on this pic:

At the moment you’re on the right hand side of the "constant failure rate" section. You can rename the y axis "probability of failure" and the x axis "mileage".
Many people will be ok if they let the service interval lapse because it's the probability of failure that is increasing, which doesn't mean that it will definitely fail. That however doesn't make it the right way to go.
There are a few different maintenance methodologies you can look at:
Breakdown maintenance:- Wait until it breaks then fix it, this has the advantage of the longest service life however when the item breaks it can take other things with it and your bike can be out of action for quite some time. Given the failure of one item will cause the failure of other things it is readily apparent that this method can be quite expensive.
Preventative (or interval based) maintenance:- This is based on the curves in the picture above, what we are doing is changing items at a given interval to make sure you stay in the flat part of the curve, this ensures that failures are as unlikely as possible and that downtime is managed. The downside is that you may be replacing parts that are perfectly ok, or adjusting things where it is not particularly necessary it does still work out significantly cheaper that the breakdown maintenance method.
Condition based maintenance:- This is where something is only adjusted or replaced when the machine starts showing symptoms that it is wearing out, there are a bunch of different methods that can be used for condition monitoring and analysis that I wont go into but suffice to say that this method gives the advantages of the other two without the downsides and is the cheapest overall and as such is the preferred.
Honda use a combination of condition based and interval based maintenance, at a particular interval the condition of an item is checked for signs of premature failure, then if necessary it will be replaced, other things like your chain are maintained purely on an interval basis (for me every Friday arvo). This ensures that replacing expensive parts is not done until it is necessary but things are checked often enough to pick up premature failures.
So while your valves may be perfect, the reason they should be checked is that this is about the time premature failures may start to occur so it is a good idea to have it inspected because the last thing you want is to drop a valve.
If you’re worried about the cost this is a job that someone with a reasonable mechanical aptitude can tackle by themselves without any great difficulty, there is a write up in the how to section if you’re interested. But IMO you are far better off having it done for no reason than finding out that you should have.
Now the how to bit:
Now that we have covered a couple of different types of maintenance we can have a look at what needs to be done and how to actually go about it, I know that the info presented may appear to be for a particular year model but it applies across the board...
So, given that a few of you are unlikely to know exactly what kind if things need to be done and when they need doing, here is a picture of the maintenance chart you will find in your service manual:

Next I'll address each item on its own:
Fuel Lines
This is an easy thing to check, in basic terms you are simply lifting the tank and inspecting the fuel lines for leaking or weeping around all of the connections, including the banjos and where the fuel rails meet the injectors, and looking for cracking of any of the lines.
If you do notice anything, replace the part in question immediately. In addition to this it’s generally a good idea to replace your flexible fuel lines once every 4 years simply as a matter of course due to the potential outcome if one fails...
Throttle
Again, another simple one - just check how far your throttle moves before the slack in the cables is taken up, this should be about 2 - 4mm. If it’s more, you can adjust it at both the throttle and throttle bodies.
Air Filter
Something you should never skimp on is your air filter - when it gets blocked up your engine will start running rich which will result in reduced fuel economy and power, but thankfully its not a dangerous situation for you motor to be in. However if you let it get to bad and stuff (dust) starts to pass through it you will find that you begin to grind away the inside of your engine. To replace it just pop you fuel tank up, then undo the brace holding your ECU in place, unplug the IAT (intake air temp) sensor and undo all of the screws holding the top of the air box on and remove it from the bike, next undo the screws holding the air filter and replace with a new element.
Here is an excellent write up: http://www.600rr.net/vb/showthread.php?t=182601
Spark Plugs
IMO this is one of the more important things to check periodically as it is an excellent gauge of how well your engine is running, what you want to see when you pull them out is a light brown coating, if you have a white coating you are most likely running lean and if you have a dry black carbon coating your probably running rich. You also want to make sure that the spark plug electrode is nice and pointy, and that the gap is 1mm (0.04") - check this with a wire gauge not a feeler gauge. If the spark plug is damaged in any way or excessively dirty replace them with new ones.
The spark plugs are a bit of a PITA to remove, if you have an 03-06 you are in luck cause your bike came with a tool specifically for doing this otherwise, see if you can get the tool... all you have to do is remove the lowers and mids, undo the radiator (but not the coolant hoses) and horn, then unplug the wires from the coils and pull the coils out (not easy) then undo the spark plugs.
When you put them back in you want to do them up hand tight then half a turn further.
Here is a write up for the plugs: http://www.600rr.net/vb/showthread.php?t=221626
Please note that Kidnplay has removed his radiator hose, which while it will make life easier, is not necessary.
Spark plug part numbers:
03-06
NGK: IMR9C-9HE
03-08
NGK: IMR9C-9HES (NGK alternative to the 9HE)
DENSO: VUH27D
09+
NGK: IMR9E-9HES
DENSO: VUH27D
Valve Clearances
Only attempt to do this if you have some mechanical aptitude as there are a few things that can go wrong...
Having said that, it is certainly something that the home mechanic can successfully accomplish.
One thing to be aware of is that if the clearances are out a little you may end up not being able to ride the bike for some time while you wait for the correct shims to come in at your local Honda dealer, cause believe me the last thing you want to do is go through the effort of pulling it all apart only to have to do it all again a week later when your bits arrive.
For a how to check out this thread: http://www.600rr.net/vb/showthread.php?p=3262595 (Thanks Dreamzboy)
Or there is this one, its a little less detailed: http://cbrworld.net/forums/thread/248256.aspx (Thanks abadfish)
Engine Oil and Filter
IMO you should check your engine oil level every time you clean your chain, ideally you should do it before every ride but who is going to do that?
There is a lot of talk about what oil you should and or shouldn't use, I'm going to enter into that discussion a little here...
It's quite simple, there are four things to consider:
1. You have three types: Synthetic, semi-synthetic and mineral. The way I see it, you should run a mineral oil for the first 1000 miles or so but after that it doesn't really matter to much so it’s all down to personal preference.
2. Brand. Pay for a well know and decent brand and your set, i.e. stick with Motul, Castrol, Amsoil and the like.
3. Viscosity. The standard oil that comes in the bike is SAE 10w40, this will be suitable for almost everyone on here and I would recommend sticking with it for the best part, however I have included the chart just in case you want to pick a different one.
4. Don’t buy one that is labelled 'Energy Conserving' or that contains molybdenum additives or you will find that your clutch will slip.
As for changing the oil and filter check out this thread here:http://www.600rr.net/vb/showthread.php?t=116041
When you put your drain plug back on, just make sure to use a new washer cause the last thing you need is a rear tyre covered in oil, and do the plug up to 22ft-lb
When you replace the oil filter itself you should apply some new clean oil to the rubber gasket and do it up to 20 ft-lb, or hand tight then 1/4 - 1/2 a turn further.
Idle Speed
Chances are that you don't have to check this at all as you will notice as soon as its starts to get a bit off, but fwiw:
To adjust the idle have a look down on the left hand side of the bike and you will see a knob down next to your coolant hoses, give that a turn to adjust the idle. It should be set to 1300rpm +/-100.
If you do decide to adjust it, be aware that the cable will sometimes break right next to the throttle bodies, and it’s a bit of a PITA to change it.


") unless of course you want to remove the PAIR system, then go right ahead.
unless of course you want to remove the PAIR system, then go right ahead.